I was now back to Rob's Adobe Creative software workshop session, and today we were looking into creating an interactive PDF document on InDesign, this meant that we could attach buttons and videos onto the pages in order to present it through a PDF. We focused upon basic techniques with which to produce an interactive portfolio, helping us to present our design work, research and development materials, in a compact and effective manner. The session included an overview of the key media types which can be embedded into the PDF file, considering video compression (via Vimeo) and basic audio editing (Audition CC).
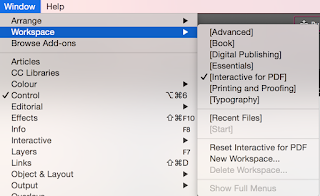
 Setting up the InDesign document was the first stage, making sure it was standard screen size, 1920 x 1080 pixels. I also needed to make sure the workspace was set up so it was easy for me to edit the interactive document. Therefore I went to Window: Workspace: Interactive for PDF. This gave me a lot more option on my side tool bar compared to using 'Essentials' which is usually how I set up the rest of my documents.
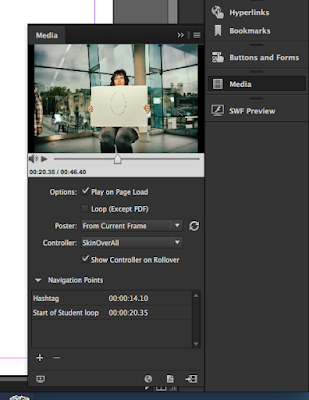
A video that was created before hand, was put in a folder that we were all able to insert into our documents, this video was used as the interactive part of the file. It shows a slideshow of photographs, involving students in different positions, holding pieces of paper with text or illustrations on. Once this video was selected on the InDesign document, I could select the 'Media' option on the side bar, and tick the boxes necessary, including 'Play of page load' and 'show controller roll over' which meant when the mouse was hovered over the video, a control bar appeared, provided me with the option to pause, play, or skip parts of the video - just like a youtube video.
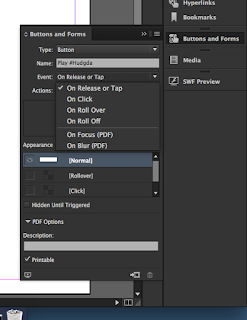
 Buttons were needed to control the video, so I designed a button in Photoshop and placed it onto my Indesign document, this button was there to simply play the video on the click. I created this effect by using the Button and Forms setting on the left hand side, I selected a navigation point (the start of the video) and set the video to play from this point onwards using the 'On release or Tap' option.
 Now I had a button that played the video from the beginning, I thought I'd create a button which played it from a point of my choice, such as when the students held a piece of paper up displaying the hashtag for 'HUDGDA'. I used the navigation point setting again, and set the button to play from the HUDGDA, which was 14 seconds in.

As well as creating buttons, we created small thumbnails that presented parts of the video, once these thumbnails were clicked, the video would play from that point onwards. This technique was designed in the same way I created the 'Play' button. As you can see, below are the thumbnails I decided to use, against the large video on the right. Underneath these images is the settings box I used, showing all the individual settings I changed to manage the interactive document. I made sure all the images were changed to buttons, and stuck with the setting that let them play on the release of the mouse. I linked them to my video, and made a number of navigation points that I could then link individually with the right thumbnails. I didn't manage to finish this task throughout this session, I found it quite hard so it took more time than anticipated. I have never set up and interactive PDF document before, this was my first time, and I hope to use the techniques and skills I have covered today, in future portfolios.


